
Microsoft Teams Support
On this page you'll find tips & tricks for Microsoft's online meeting software called Teams.
Got a question that needs answering - or do you have something to share that should appear on this page to save others valuable time and tiresome frustration? Please let us know!


Using Teams
Getting started
You will receive a link from the host of the meeting by e-mail.
Click the provided link and you'll get three options:
- Download the Windows-app
Using this app surely has its benefits and downloading and installing it, is a one-time action. - Continuing in the current Browser
Using Teams without the app is possible, but there will be limitations, for example, there's no chat-option available. - Opening the Teams-app
Our pick! Once the Teams app is installed you'll get all the features and the best possible quality.
- After this choice you'll arrive at a screen, where you can see if your microphone and video are set correctly.
Check if both are OK. - Select "Join"
If the meeting has already started you will enter the meeting immediately.
If the meeting has not started yet, you will be placed in a waiting area with a notification that you are about to be admitted. Once the meeting starts you will be automatically brought into the meeting.

PC: Menu when moving the cursor
When you move your mouse cursor in Teams, the following menu will appear:- Time that has passed
- Video on/off
- Microphone on/off
- Sharing a screen
- Menu settings
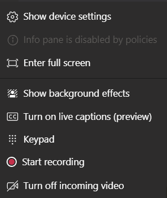
- Show device settings
The settings of your camera and phone - Info panel - Information about the Teams meeting
- Enter full screen - Making Teams full screen
- Show background effects - Choosing backgrounds
- Turn on live captions (preview) - Live subtitles of the current speaker
- Keypad - Call menu to make a call (outside of Teams!) from Teams
- Start recording - The host can choose to record the meeting
- Turn off incoming video - Turns off all video, you only have sound (your own webcam will remain on!)
- Show device settings
- Chat - View and send messages
- Participants - Show participants
- Leave Teams


Views
- During a meeting, select the three dots in the black bar at the top right.

- Select the desired view:
The standard view. Dimensions depend on the number of participants.

All participants are shown in a mosaic of camera images.

- Vanaf 10 deelnemers
Participants are placed in an image that mimics a physical place.

- From 5 participants
- Depending on host settings
- Right-click on the image of a participant
- or -
Select 'Show participants' to view a list of all the participants
Click on the '...' to get to a submenu of a selected participant - Select 'Pin'
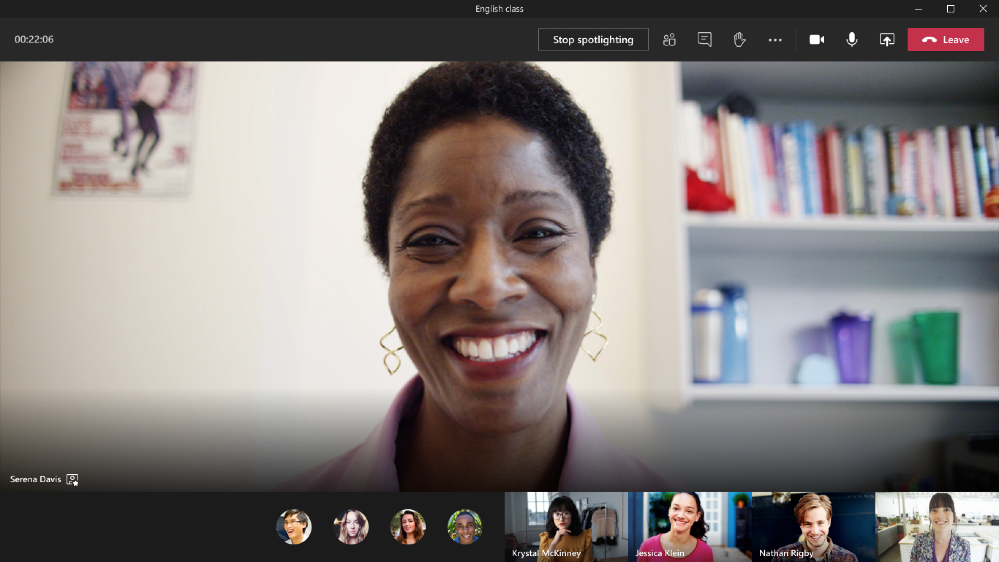
- Select 'Unpin' to stop pinning this participant
The host has the ability to highlight a participant for the entire group.

- Selecting a different view remains possible

How to change your name
The Teams meeting application is connected to your personal Microsoft account. This means that if you wish to change your display name in a Teams session, you'll need to pay close attention, because if you change your name "there," it will be changed in all Microsoft applications. (Of course, you can easily revert it after the meeting!)
For a PC with Teams installed:
- Start Teams
- Select 'Personal' at the top of the screen.
- Select your current screen name (it is printed bold)
- Select 'edit name'

Tips & Tricks
- A strong host , makes sure everyone participates, even those without video.
- Hint: Make a list of the names of the participants and put a line next to a participant when he/she says something. Tip: Make a list of the names of the participants and put a check mark next to a participant when they say something.
- To present a Powerpoint:
Open the desired Powerpoint file > choose Slideshow > click 'present online and choose the meeting with whom you want to share this presentation. - It is perfectly normal to see your own video image in mirror image. Other attendees will see you appear correctly on their screens
- Please use the app rather than the Whiteboard that you can invoke directly in Teams.
Why? In the app you can easily create sticky notes and upload images, moreover things are aligned very well which makes it all look just a bit tighter and neater. - You can pin images and use them as a template.
- Rectangles are sticky notes
- Tip: In a corner of your presentation, create your own communication area.
Here you can indicate, for example, how many minutes participants have left for their assignment. - You can log in to the meeting with the same account on different devices.
- When using different devices at the same time please note that there may be a delay when using wifi, This can cause 1 of the devices to 'lag behind'.

Useful links

Installation
Install the Teams app to be able to conduct meetings properly.
Without installation, meetings can be followed but there are serious limitations such as no chat feature.
- Download the desired Teams app via this site.
 Windows PC: Start the installation by activating the downloaded file.
Following this, Teams will be available via the start menu or an icon. Android
  iOS: A Teams icon appears.
- Start Teams

Questions?
Questions about Teams?Send us a message and we will try to help you.
[cf7form cf7key="contactform-short-nl"]
